Troubleshooting Time Doctor Server Errors
When you encounter an error like The Time Doctor server has encountered an error or a Server offline, this could happen for a number of reasons. To narrow down the possible causes, some diagnostic tests must be performed.
Any of the following could be possible causes:
- A local area network problem
- A router or firewall problem
- An Internet Service Provider (ISP) problem
- A name resolution (DNS) server problem
Before attempting the following steps, make sure that you or your users have the latest available version of Time Doctor installed. It is also important to disable any security application suites (including Avast, Norton, Symantec, and McAfee) in order to prevent those applications from interfering.
Step A: Check Server Communication
- Verify that your internet connection is working properly and that you are able to browse any website, http://login.timedoctor.com in particular.
- If you are unable to browse the internet, check your internet connection setup: cables, wiring, router connection, etc.
- Open a browser and visit https://api.timedoctor.com/v2/api/server_connection_test.php. If your computer is able to communicate with our server successfully, you should see the text Connected to Time Doctor Server in your browser.
- Open a browser and visit http://api.timedoctor.com/. You should be redirected to Time Doctor API Documentation.
Step B: Delete Your Local Cache File
For Time Doctor Lite and Time Doctor Pro:
- First, make sure that your Time Doctor application is completely shut down. To do so, in the desktop application, click Options > Exit.
- Then, delete your local cache folder. Instructions on how to do so can be found here for Windows, Mac, and Ubuntu/Linux.
- Restart your Time Doctor application. This will automatically re-create the local cache file. Try to log in.
For the new Time Doctor app (Window and Mac users only):
- First, make sure that your Time Doctor application is completely shut down. To do so, in the desktop application, click File > Exit.
- Then, delete your local cache folder. Instructions how to locate the files can be found in these videos for Windows and Mac.
- Restart your Time Doctor application. This will automatically re-create the local cache file. Try to log in.
Step C: Check Name Resolution
For Windows:
- Click Start > Run. Type CMD and press Enter.
- In the terminal, type nslookup.
- In the nslookup prompt, type api.timedoctor.com and press Enter. The output must contain the IP addresses of our servers.
- Perform another name resolution check in nslookup by typing login.timedoctor.com and pressing Enter. The output must show an IP address from our server.
If any of the above steps show error messages such as Non-existent domain or any other type of error, then there is a problem with the name resolution which will require you to override the DNS server being used by your computer.
For Linux:
- Open gnome-terminal or any variation of terminal. (xterm, etc.)
- In the terminal, type dig api.timedoctor.com and press Enter.
- Do another lookup by typing dig login.timedoctor.com and pressing Enter.
The output of each command must contain IP addresses from our servers.
If there is a problem with name resolution, it will require you to override the DNS server being used by your computer.
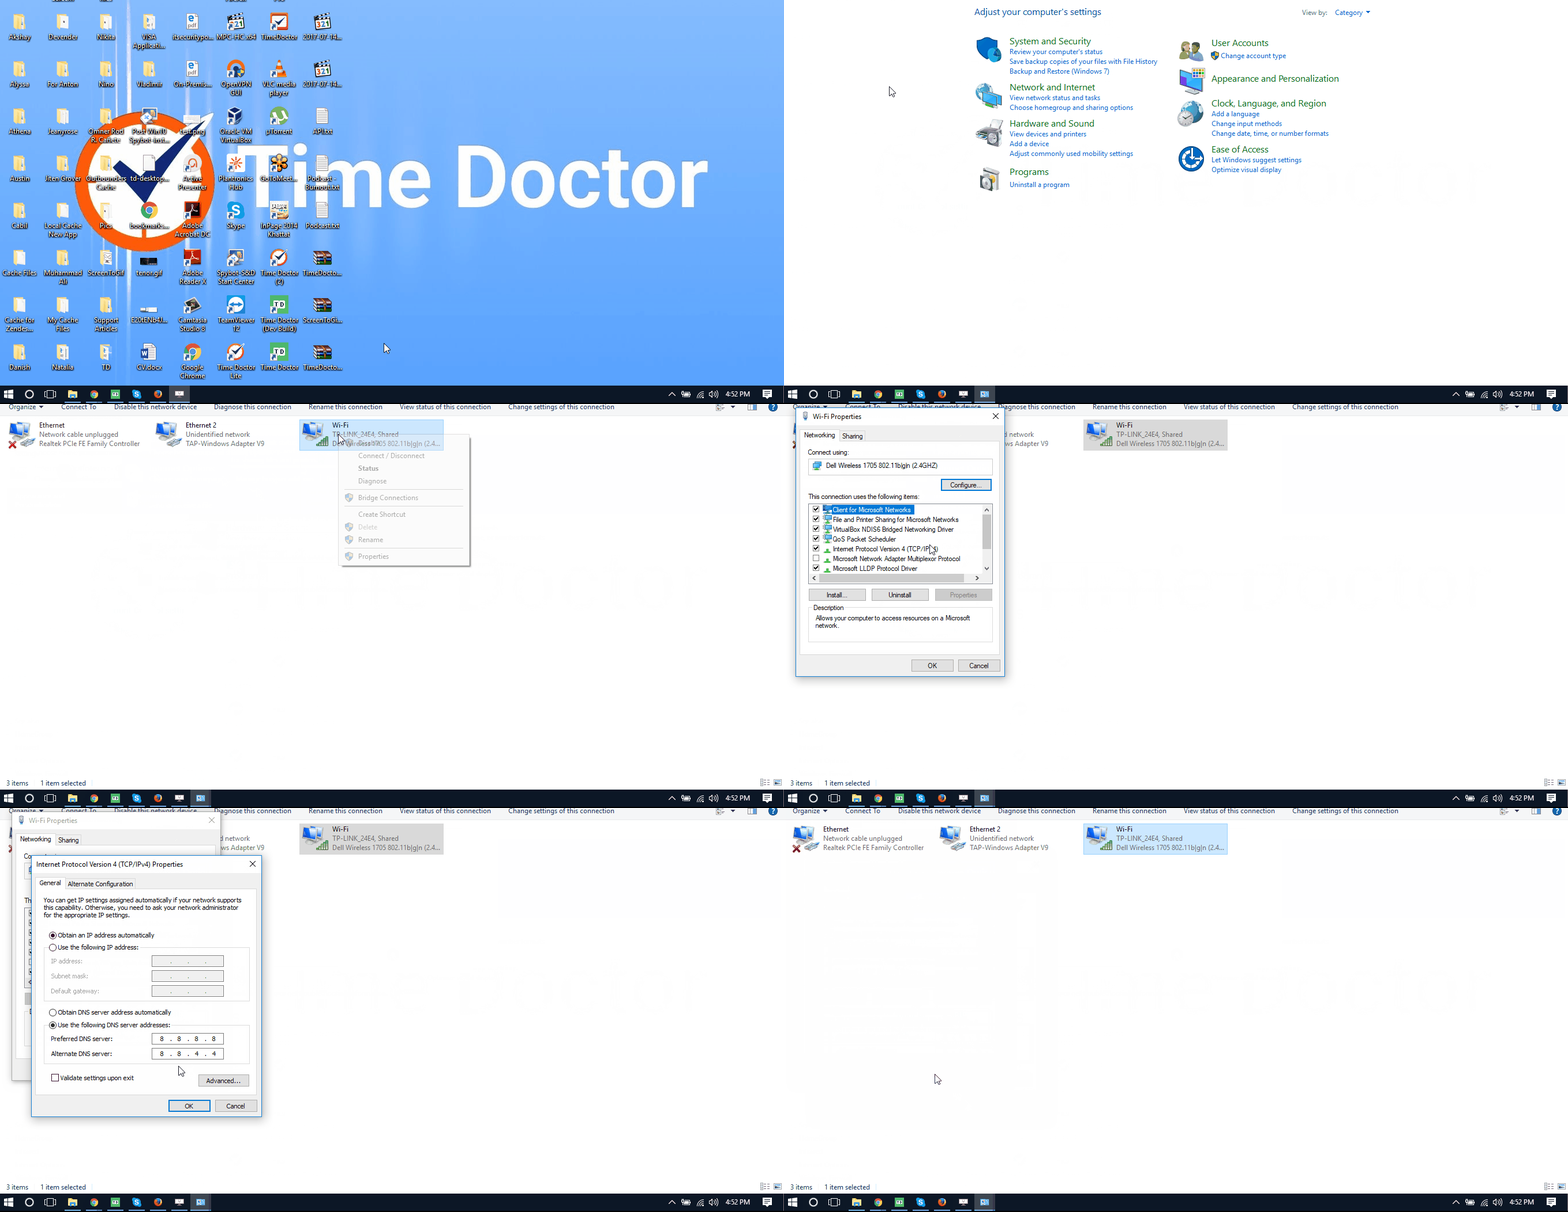
Step D: Overriding DNS on Windows 7
1. Open the Windows Control Panel.
2. Click on Network and Internet and load the Network and Sharing Center.
3. Click on Change adapter settings.
If you are using WIFI, choose WIFI adapter.
If you are connected to the internet via a wire connected to your computer, choose Local Area Connection/Ethernet.
4. Right-click on Local Area Connection and click on Properties.
5. When the UAC prompt appears, click Yes.
6. In the Local Area Network properties, select Internet Protocol Version 4 (TCP/IPv4) and click on Properties.
7. In the Properties window, mark Use the following DNS server addresses.
We will override the default DNS server settings provided by your ISP or router and will use custom DNS server addresses instead.
8. In the Preferred DNS server and Alternate DNS server, use any third-party DNS server. The following are DNS server addresses we actively use and recommend
- Google DNS: 8.8.8.8 and 8.8.4.4
- OpenDNS: 208.67.222.222 and 208.67.220.220
- Level 3: 4.2.2.2 and 4.2.2.1
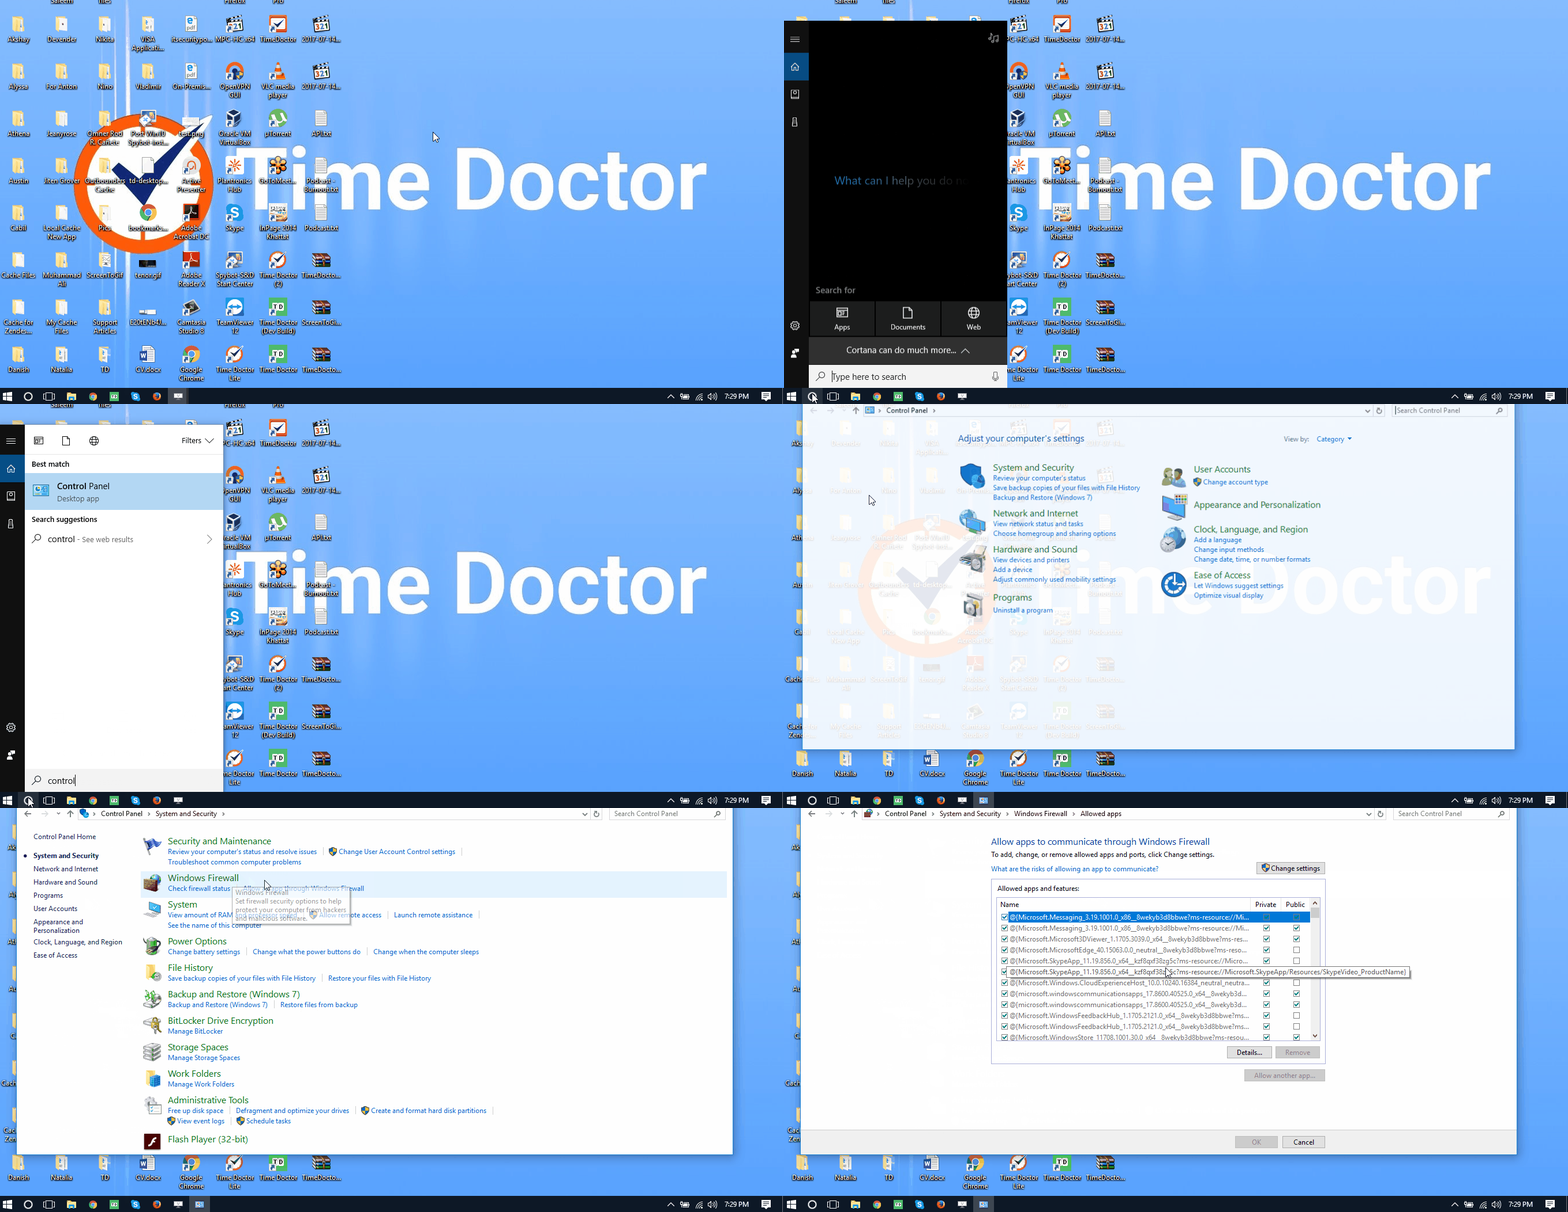
Step E: Allowing the Time Doctor Application in the Windows 7 Firewall
1. Open the Windows Control Panel.
2. Click on System and Security and look for Windows Firewall. Click on Allow an app through Windows Firewall.
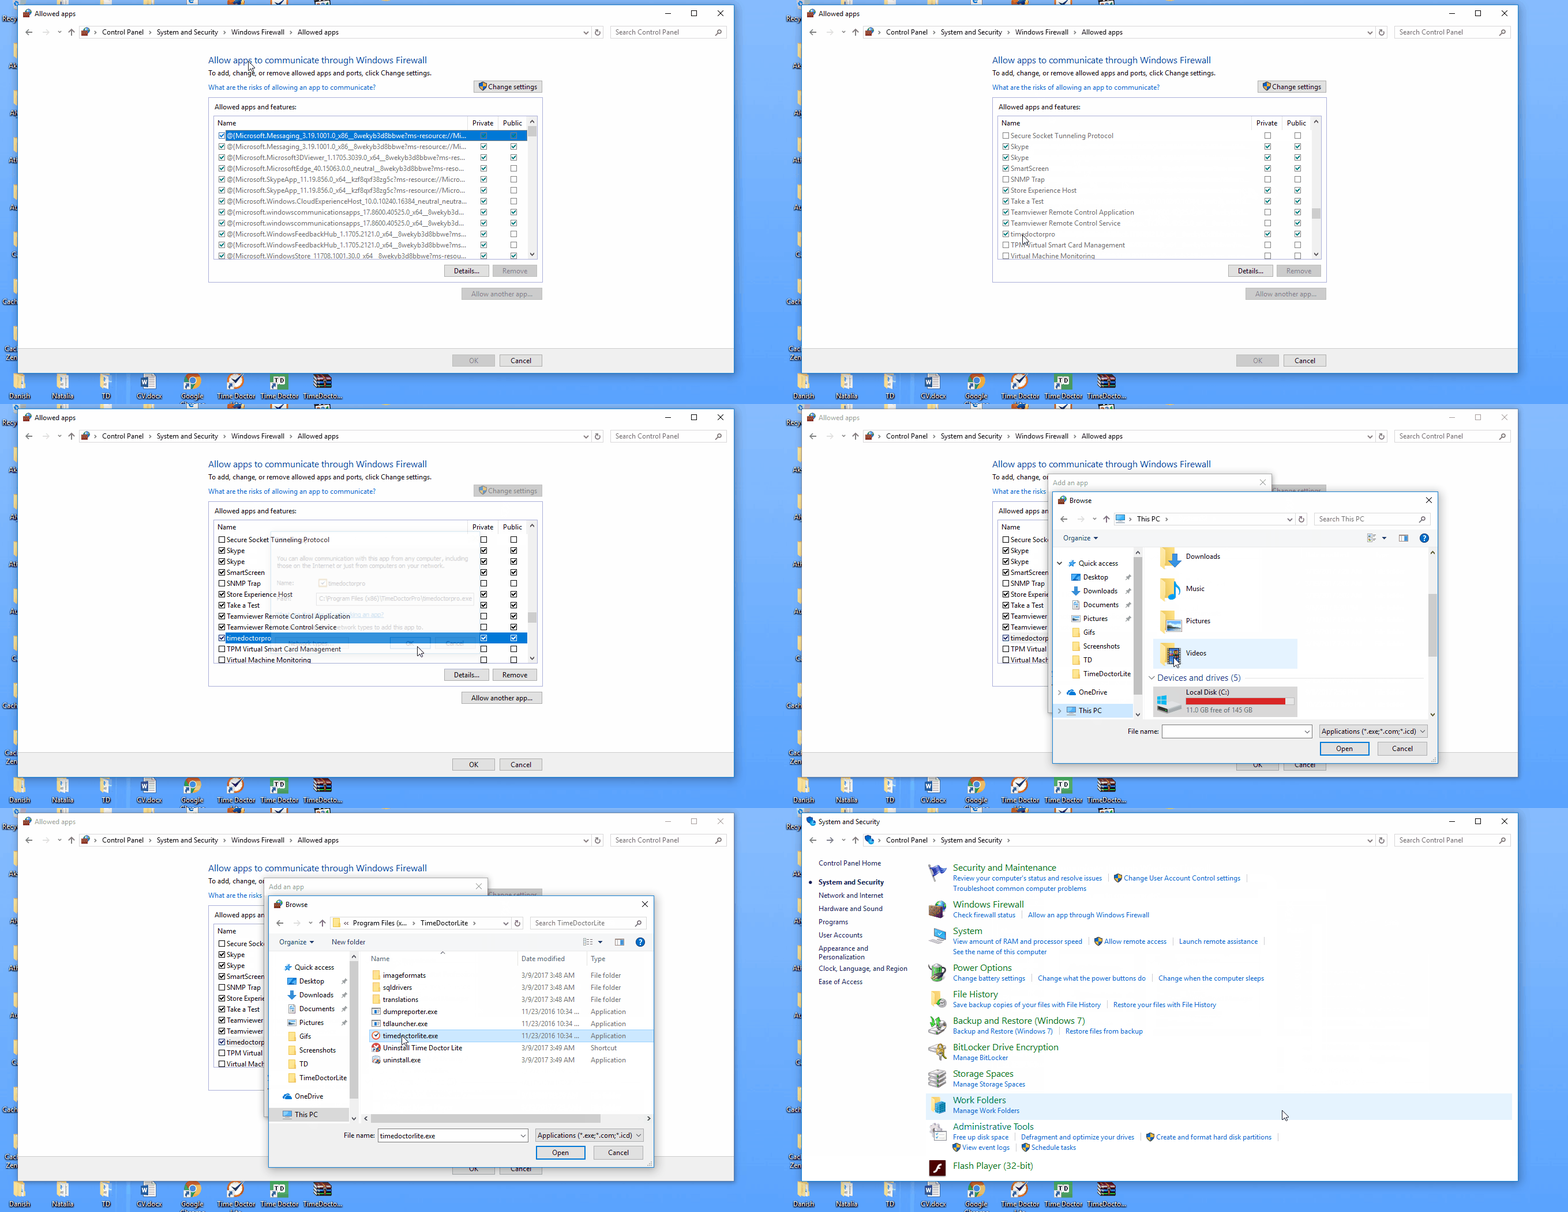
3. From the Allowed apps and features list, click on Allow another app.
4. From the Add an app list, look for Time Doctor and click Add.
Time Doctor should now be included in the list of Allowed apps and features.
If, with all the steps completed, a server error is experienced or the server is still offline, please follow the instructions in these articles to send us your cache file for further investigation.
For Windows (All Versions): Finding Time Doctor Local Cache Files in Windows and Exporting App Local Data
For Ubuntu and Linux (All Versions): Finding the Time Doctor Local Cache Files in Ubuntu
For Mac OS and OS X (All Versions): Finding the Time Doctor Local Cache Files in Mac OS & OS X


